Tuesday, May 31, 2011

It's Party Time At... Decorate To Celebrate!! Enter our Grand Announcement Giveaway!!

**This post will stay at the TOP until May 31st.  Please scroll down to see more recent posts.  Thanks for visiting!!**

Welcome to our BRAND NEW Challenge Blog!!  Decorate To Celebrate is dedicated to showing off your decorations (and all things 'party' related) for every celebration!!  We invite you to join us for a two-week challenge beginning June 1st.  We want to see your table decorations, centerpieces, wall hangings, banners, favors, invitations, and more!!  Each challenge will have a specific party theme (from baby to birthday to anniversary to holidays and everything in between!), and we want to see what YOU create using any method you desire -- paint it, cut it, mold it...  use your Cricut, Sizzix, any other die cutting machine (or none!)...  use paper, fabric, wood, glass, tile, florals...  the options are endless -- Show us your creativity!!

While we will have prizes offered for challenges, we also hope to spotlight our talented participants with Guest Designer spots for EVERY challenge!!  If you win a challenge, you will be invited as a Guest Designer for a following challenge -- allowing us to feature YOU... YOUR BLOG... and, best of all, YOUR CREATIVITY!!

For the next few weeks leading up to the announcement of our very first challenge (June 1st!), we are going to be kicking off the decorating and celebrating with inspirations, tips, ideas, tutorials, introductions, and...  oh, yeah!!  A GRAND ANNOUNCEMENT GIVEAWAY!!  How about we get to the giveaway now??

It's a "YOUR CHOICE" prize package!!
One lucky winner can select either
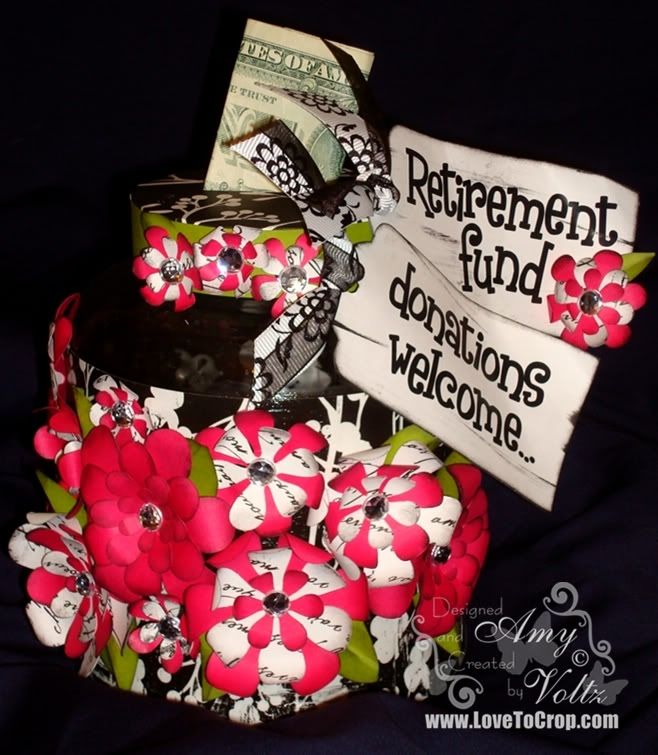
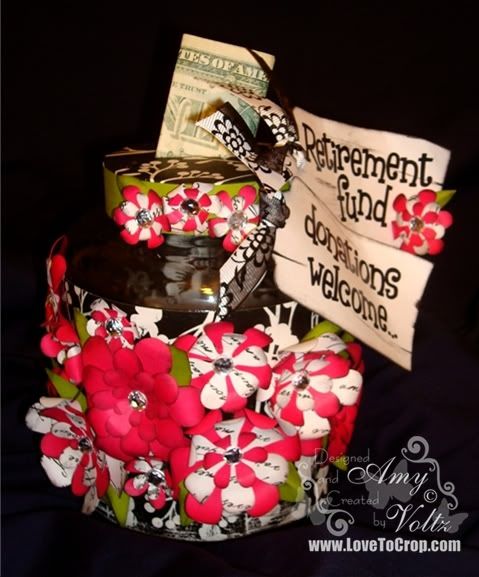
a SURPRISE gift box full of goodies
OR
a $50 Creative Memories Gift Certificate!!

We've got LOTS of ways for you to get LOTS of chances in the drawing!! Here's how:
  1. Become a follower and leave a comment stating that you are now a follower (1 chance).
  2. SUBSCRIBE via email (enter your email in the box on our sidebar and follow the instructions to activate the subscription), then leave another comment stating that you have activated your email subscription (+1 chance).
  3. Add our Blinkie to the sidebar on your blog (copy the code found under our blinkie on the right, go to the 'design' button on your blog, click on 'add a gadget', select 'html/JavaScript', paste the code into the pop-up, click save, and confirm location of the blinkie on your sidebar), then leave another comment with a link to your blog (+1 chance).
  4. Publish a post on your blog about our new Challenge Blog AND Giveaway, then leave another comment with a link to your blog (+1 chance).
  5. TWEET about our new Challenge Blog/Giveaway, then leave another comment -- please include your Twitter name (+1 chance).
  6. 'LIKE' us on Facebook (click the badge on the right), then leave another comment (+1 chance).
  7. Share a link to our new Challenge Blog/Giveaway on Facebook, then leave another comment (+1 chance).
  8. Create ANY new project for any party theme (table decoration, banner, favor, etc.) and link it below, then leave another comment (+3 chances!).

***(5/23/11) Edited to add***
Now, who's ready for some BONUS chances in our Grand Announcement Giveaway???  The original post has been edited to include these extra chances, but we wanted you to know that you have 8 days left to stack up some chances for our $50 Gift Certificate (what would YOU choose with that?  One of the exclusive Cricut Cartridges -- Stork's Delivery, Cheerful Seasons, or Reminisce Accents?  Or maybe a selection of paper, stickers, and embellishments?  A new scrapbook album to fill with fabulous memories?)...  So if you're interested in the BONUS chances, pick one or ALL of these opportunities:

  1. (BONUS)  Leave a comment on EACH of the previous 7 project posts and any new project posts before June 1 (Click on the numbers to go to each post: #1, #2, #3, #4, #5, #6, #7).  If you have already left a comment on any of the previous project posts, those will count as long as you leave ONE new comment on this post telling us to add your chances!!  (+1 chance for each post).
  2. (BONUS)  Leave a comment on ANY or ALL of the current 'pre-challenge' participants projects...  Simply click on the name of each Inlinkz link (under the Grand Announcement Giveaway Post) to visit the projects.  Once you have left your comment(s), come on back and leave a comment here telling us how many projects you visited (you do not have to leave a separate comment for each as long as you tell us how many projects you posted on)!! (+1 chance for each project you comment on).
  3. (BONUS)  Invite your friends to join our Giveaway!!  Share a link to our blog on your blog, facebook page, twitter account, etc. and tell your friends to MENTION YOUR NAME on the Grand Announcement post when they hop over and become a follower -- Not only will they be entered to WIN, but YOU will also get an extra chance for EACH friend you send!! :)  (+1 chance for each friend who mentions your name).
That's A WHOLE BUNCH of possible chances to WIN (so far! -- Keep checking back for additional chances to WIN!)!!  Thanks so much for helping us spread the word!!  This Grand Announcement and Giveaway will remain open until 11:59pm (EST) on May 31st!!

Thanks so much for helping us reach our goal of 100+ followers by June 1st!!  We appreciate YOU!!

Monday, May 30, 2011

attention only one more day hop over to decorate to celebrate

just letting you know one more day till a winner is picked. Also new challenge kicks off with a fathers day party decoration. Cant wait to see everyones great party ideas. Please tell your friends to hop over and become a follower we are only ten away from a 100. I will be making someone a mini book of there choice if we reach a 100 before tues. So close would so appreciate it if you would spread the word. love ya all and hugs Rhonda and Amy

Thursday, May 26, 2011

We're so FORTUNATE!! Fortune Cookie Favors to share... (GIVEAWAY REMINDER!!)

Hello to all of my creative friends!!  I just wanted to thank you -- We are so FORTUNATE here at Decorate To Celebrate! to have so many wonderful friends who have already chosen to become followers!!  However, WE NEED YOUR HELP!!  Rhonda and I would love to start our first challenge with 100 followers -- and we're SO close now...  Would you be willing to invite a few friends over to visit us here today?  If you know someone who loves to make party favors or decorations or cakes, please invite them to share one of their projects in our Grand Announcement Link-Up...  We'd love to see what everyone has made (they can re-post a previous project -- it doesn't have to be a new creation for our Grand Announcement Link-Up!!  Plus, we're still looking for a few Guest Designers for some upcoming challenges!!)

We're offering some incredible BONUS chances when you refer a friend; share a link on facebook, twitter, or your blog; and visit some of the entries in the Grand-Announcement Link-Up!! :)  In addition (and in case you didn't hear), Rhonda is making one of her FABULOUS mini albums for one lucky winner when we reach our goal of 100 followers by May 31st!!  Isn't that AWESOME???  So, we'd like to say THANK YOU in advance for sharing and helping us reach our goal!! :)

Now... onto my party favor project for you!!
I first saw paper fortune cookies like these a few years ago at a craft fair -- I loved them so much that I remember buying several of them for about $1 each...  They had lovely little tags inside that had messages of friendship so I had passed them on to a few friends hoping they would enjoy them as much as I did.  I haven't thought about those little fortune cookies much since then until just the other day when I was thinking about cute party favors that are quick to make.  The ones that I had purchased were made with bright patterned paper, but I wanted to try to make mine look as 'realistic' as possible...
Of course I did not keep one of those fortune cookies that I purchased so long ago for myself, so I spent some time playing with the paper (and eating a lot of REAL fortune cookies to see how they looked!!) to get the folds right...
These little favors are perfect for so many occasions -- Graduation parties, birthday parties, weddings, and showers!!  My fortune slips read: "We're so FORTUNATE to know you...  Thank you for sharing in our special event!!"
To make these darling calorie-free favors for your next celebration:
  1. Cut the circles from ivory cardstock at 4.25" (I used my George Cricut Cartridge; however, any cartridge with a plain circle will work.  I tried with smaller circles, but I couldn't get it to fold correctly).  Ink the edges of the circles with SU! Creamy Caramel ink (optional).  
  2. Start to fold each circle in half...
  3. ONLY pinch the center of the fold (so there is a crease at the center of the circle)...
  4. Lay it flat again.  
  5. Use STRONG adhesive (I used my ATG gun)... 
  6. Apply adhesive on both sides of the crease (about 2" in length of adhesive).  
  7. Bring the two edges (opposite of the way you folded in #2) of the circle towards each other and...
  8. Gently push that pinched crease in...
  9. So that it will collapse the rounded tube-like center of the circle...
  10. Continue bringing the edges back towards each other and... 
  11. Press the adhesive firmly to hold the edges together.
  12. Voila!!  You have a paper fortune cookie!!  If you would like to add a fortune to the inside, cut your fortunes into strips and add a strip inside the fold at step #7.
I hope you have enjoyed seeing my fortune cookies today -- And I hope you'll try some of these for yourself!!  Be sure to let me know if you do -- I'd love to stop over and see yours!! :)

Remember --  Our first official challenge begins NEXT WEDNESDAY (June 1st) at 8am with a "Father's Day Party" theme...   Whether you make treat bags, centerpieces, banners, gift bags, invitations, cupcakes, or any other party-related project, we want YOU to link up and get noticed!!  So celebrate Dad and Decorate To Celebrate! with us!!

Thanks so much for joining me today!!  Until next time...

Tuesday, May 24, 2011

Retirement Party? Let your guests know that donations are welcome :)

I have a friend who recently retired...  I mean, she really retired!!  She didn't leave her job and go find a new one at McDonald's or Walmart...  She's spending her days gardening, volunteering, and being crafty!!  Now THAT'S the way to do it!!  :) 

So I got to thinking about what kinds of things you would use to decorate at a Retirement Party...  It's a celebration, right?  And we all want to decorate our celebrations, right?  And when ya retire there are quite a few jokes out there about having twice as much time and half the money, right?  And so I thought that creating a bank  for the retirement fun(d) might be a good plan!! :)  For this project I decided to do a little recycling and reusing...  The-Girl-Child likes her pickles in BULK, so I found this wonderful jar that is rather large, but has a smaller opening (made it tough to pull the pickles out easily, but it's perfect reconditioned as a bank!!).  With the little tag reminding guests to donate for the cause, I thought it would be perfect at the entrance to the Retirement Party (or maybe you want one on every table!!).  :)
To create my bank, I started by removing all of the labels with Goo Gone.  The factory info and expiration date were ink stamped onto the jar, but a touch of nail polish remover erased all residue and left the jar as good as new. :)  I cut two strips of 4x8 decorative cardstock and used Modge Podge to adhere the strips to the jar.  I've reused jars like this in the past (click here to see the Halloween jar I made last year) and I've found that adhering the paper strip with Modge Podge creates a much better base for adding embellishments -- plus the wrapping doesn't pop off -- which is extremely inconvenient if you're using it as a gift and it does this IN the gift bag just before the recipient pulls a plain jar out...  How embarrassing! :)

I wanted to put a slit in the lid for the money 'donations' so I created a paper lid rather than using the metal lid (which would have required a visit to my dad and his workshop to drill through that lid -- let's just say that power tools and I are not a good mix!)... If you need directions on how to make a paper lid for one of your jars, please feel free to ask (I'll be happy to do a tutorial at some point or email you the directions)...
My flowers were cut using the Accent Essentials Cricut Cartridge (remember that one you got with your Expression???).  I cut a series of flowers ranging in size from 3/4" to 2 1/4" (at 1/4" increments), inked the edges, curled the edges with my bone folder, and layered them for different effects...  Keep in mind that every flower is exactly the same, just cut in another size/color and curled out or under depending on the look I was going for...  If you haven't tried creating any of these layered flowers yet, I hope you'll try some...  I often cut lots of extras so that I have quick and easy embellishments on hand to add to a card or tag. :)
My tags were distressed with ink and curled with my bone folder...  The letters are stickers -- I collected a stack of alphabet stickers before I got my Cricut...  Now my stack of alphabet stickers has been collecting dust!!  So I'm on a mission to use my stickers whenever I have the chance :)
Your comments and questions are welcomed and appreciated...  Remember that when you leave a comment on this post, you earn an EXTRA chance in our Grand Announcement Giveaway!!  Also, there is still time to link up your party projects under the Grand Announcement Post (CLICK HERE)...  Whether you have made cakes, cookies, cupcakes, banners, signs, table decorations, party favors, shower invitations, pinatas (did you see Rhonda's pinata???), or any other party related decoration, we want you to link it up and show us what you've got!!  We're still looking for a few guest designers, so please show us your style!! :)

Thanks so much for joining me today...

ninja turtle pinata

started with blowing up a balloon. mix flour and water and tear newpaper into strips
dip paper in mix squeeze xtra off and apply to balloon till all covered. let dry over night and repeat steps two more times. now I painted mine but youcan use tissue paper etc. after I painted made the turtle face a applyed to front of balloon now since this is for a grown up party for a joke.
they are filling the pinata with condoms, shot bottles etc. this party is just for adults.

Monday, May 23, 2011

More Chances to WIN at Decorate To Celebrate!!

There are only EIGHT days (plus a few hours) until our FIRST official challenge begins!!  Have you started on your project yet?  Our first challenge begins at 8am on June 1st, and it's a Father's Day Party Theme!!  Have you seen Rhonda's AMAZING fishing basket project?  How's that for inspiration??  It's hard to believe that she made the basket using only a cardboard box, cardstock, and some ink!!  If you haven't seen it (or if you want to take a second look), be sure to CLICK HERE...

Now, who's ready for some BONUS chances in our Grand Announcement Giveaway???  The original post has been edited to include these extra chances, but we wanted you to know that you have 8 days left to stack up some chances for our $50 Gift Certificate (what would YOU choose with that?  One of the exclusive Cricut Cartridges -- Stork's Delivery, Cheerful Seasons, or Reminisce Accents?  Or maybe a selection of paper, stickers, and embellishments?  A new scrapbook album to fill with fabulous memories?)...  So if you're interested in the BONUS chances, pick one or ALL of these opportunities:

1.  Leave a comment on EACH of the previous 7 project posts and any new project posts before June 1 (Click on the numbers to go to each post: #1, #2, #3, #4, #5, #6, #7).  If you have already left a comment on any of the previous project posts, those will count as long as you leave ONE new comment on this post telling us to add your chances!!  (+1 chance for each post).

2.  Leave a comment on ANY or ALL of the current 'pre-challenge' participants projects...  Simply click on the name of each Inlinkz link (under the Grand Announcement Giveaway Post) to visit the projects.  Once you have left your comment(s), come on back and leave a comment here telling us how many projects you visited (you do not have to leave a separate comment for each as long as you tell us how many projects you posted on)!! (+1 chance for each project you comment on).

3.  Invite your friends to join our Giveaway!!  Share a link to our blog on your blog, facebook page, twitter account, etc. and tell your friends to MENTION YOUR NAME on the Grand Announcement post when they hop over and become a follower -- Not only will they be entered to WIN, but YOU will also get an extra chance for EACH friend you send!! :)  (+1 chance for each friend who mentions your name).

Thanks so much for helping us reach our goal of 100+ followers by June 1st!!  We appreciate YOU!!

Friday, May 20, 2011

ninja turtle party decorations

here is a signature board I made for the party for all his friends to sign and for a funny keepsake. he loved the turtles when he was little and I found this picture with his favorite one.

heres the pizza boxes I made and I am going to make sugar cookies and decorate them like pizzas to put in the boxes and lay them on the tables. since we all know the turtles love pizza I also made a mini album for this its a little more grown up or as grown up as I can get it if you want to check it out it is on my main blog www.scraphappenswithRhonda.blogspot.com


Thursday, May 19, 2011

ninja turtle party

I am working on a ninja turtle birthday party, wanted to show you these cute party hats/mask
cut out shape and piece together added elastic to put around your head

heres the banner couldnt fit all in picture drew main shape then pieced together from there

each turtle has a different letter spells happy cowabunga birthday.


Thursday, May 12, 2011

grad banner by tamminnies designs

this is such a cute banner for a graduate, that we are sharing with permission of tammy
our challenge doesnt start till june first and it will be for fathers day. but you are all welcome to post your ideas for those partys coming up. hope this gives lots of inspiration and ideas for what is posssible when it comes to decorating for partys. tammy has linked up here on our new blog so if you like to hop over and see how she made this please do. hugs tammy your grad banner rocks

Monday, May 9, 2011

baby shower party prizes for the games

this is part of my baby looney theme for a baby shower. I made these for the shower games
who ever wins gets one a prize.

I cut -out tablet shape of characters and then used my bind it all


the tablet in the middle is what I used you can get three in a pack at walmart for 1.44

added a colorful pen and it will make a cute prize to win. and dats all ya! ha


Saturday, May 7, 2011

Its a boy baby shower banner

sorry I couldnt fit it all in the picture but it will give you a idea. It is really cute. I used edpd the basketball shirt and shorts and cut fit to page decorated all different and the letters spell out its a boy a letter on each shirt cut at 4in from george(shadow) The hangers are cut from new arrival at 7in real size punch 2 holes in top of hanger and thread ribbon through then hold the paper cloths on with cloths pins.

heres a closer look.


Thursday, May 5, 2011

baby looney tune baby shower favor boxes

these party favors are for a baby shower she loves baby looney tunes so I thought I would share what I made and give you alittle idea what our new fun blog will be about. you are sure to find some great ideas for your next party. I used lifes a party cricut cart, cut buggys 6in and the boxes also at 6in I drew the looney tune characters and cut them out to glue behind the buggy to look like they are peeking out. the wheels I cut from george at 1 and 1/4 in

heres a look with the bigger cart which is cut fit to page and everything is done just like on the

little baby carriages except bigger.


Wednesday, May 4, 2011

heres a fathers day party centerpiece and gift all in one

I hope you like my fathers day old time fish basket. I tryed to make it look as real as possible.
I love to decorate for every party occassion so no better time then fathers day. I thought this would be so neat on the table its filled with gummy worms, corks, and lures for dad
I will give you complete directions at the bottom of this post. I hope you find inspiration in our new blog for those partys for your children, husbands, holidays and so on.


this is the back of the basket, sorry lighting a little dark couldnt get it!


here is a side view of the basket you can see it is filled with goodies.


heres a lighter version of the front. We will be starting with our new blog soon. read about it under guest designer. now on to the instructions so you can make one for your dad or just a fishing guy or gal.


instructions for fathers day fishing basket


start with a strong box. cover the entire box. then cut three sides leaving back side to flip up so you can glue your lid on it.


use everyday paperdoll the fisherman the basket on there I cut mine at 8 in but it does depend on your box size you will least need to cut 4 so you can cut parts and pieces to piece together.


now cut strips I used my paper cutter faster. then glue strips across all the parts then distress with ink now add strips up and down and distress these also now you are ready to glue onto your box and add details.


thats it simple , so neat for dad, and filling it with goodies is endless. I will make one for each one of the dads and we usually have a party for dad every year. so this will be fun might even stick in a gift card. now hope you join in on the fun.